AI agent designs
Plugins → AI Agent Design decides how the runs of the terminal AI agent are shown: as lines in the terminal itself, in a slim bar below or above it, on a rail or in a column beside it, as a card floating over it, in the classic activity panel, or in a combination of these. A combination picks one design for each role, and you can set one combination as the default and give single connections a different one.
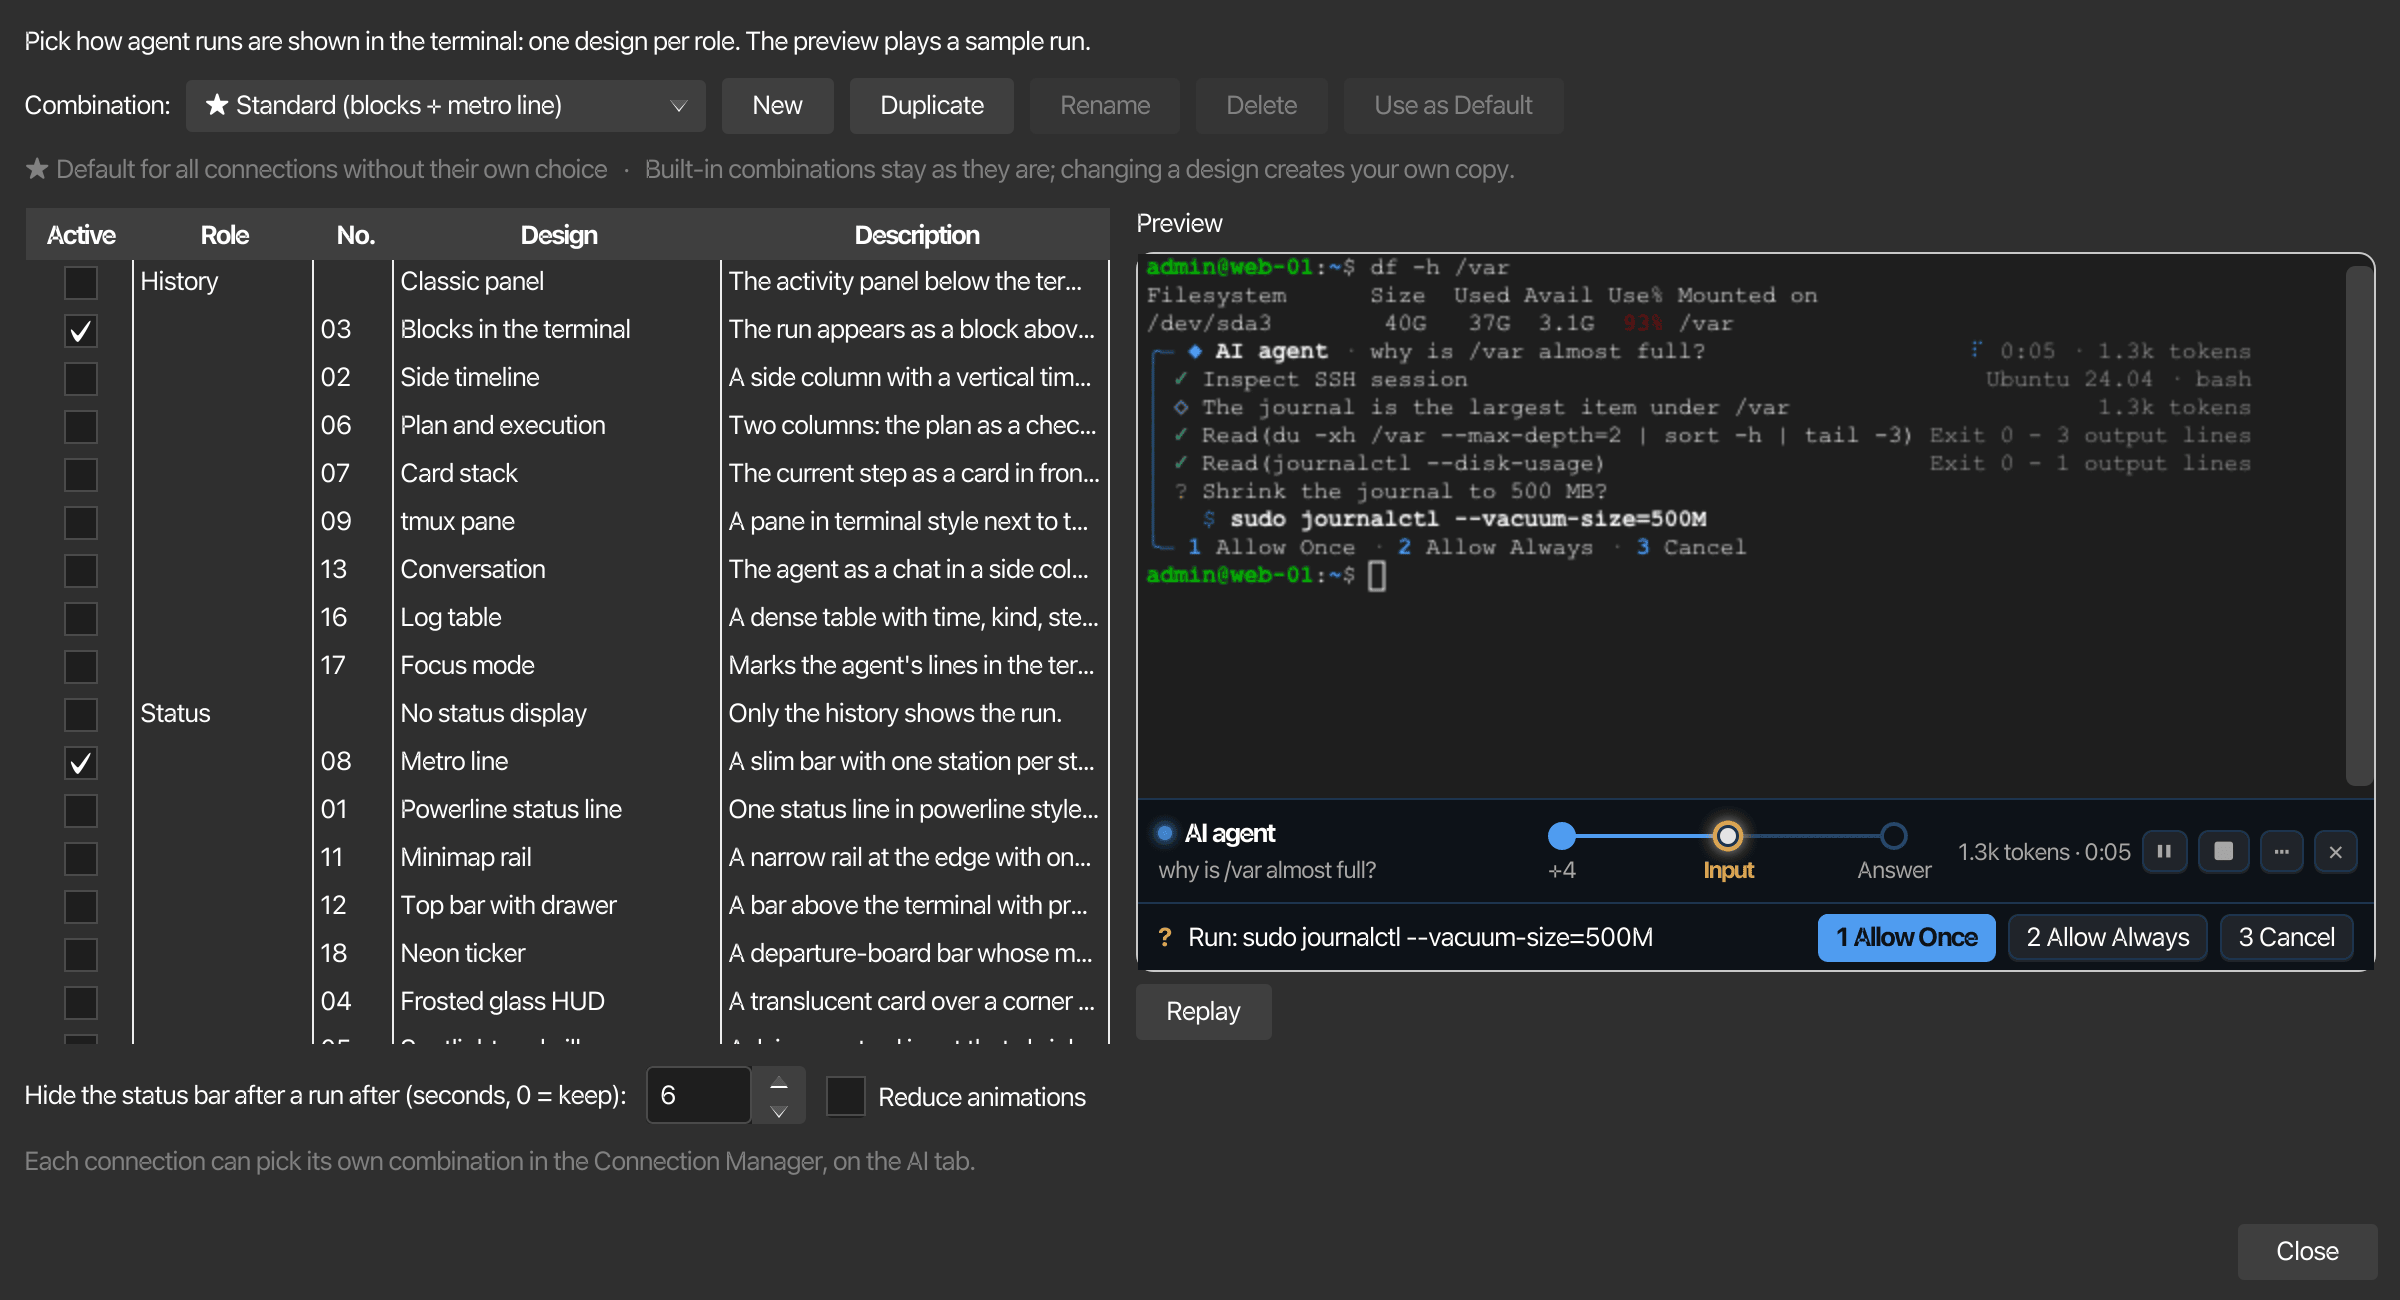
Open it from Plugins → AI Agent Design or View → AI Agent Panel → Design.... With open tool windows as tabs turned on it opens as a tab of the main window. An organisation policy that does not allow plugins locks both entries.
Roles and designs
The table lists every design with its number, grouped by role. A tick in Active chooses the design for its role in the shown combination, so each role always has exactly one tick.
| Role | What it decides | Designs you can choose |
|---|---|---|
| History | Where the steps of a run are listed | Blocks in the terminal (03), Side timeline (02), Plan and execution (06), Card stack (07), tmux pane (09), Conversation (13), Log table (16), Focus mode (17), Classic panel |
| Status | A compact display of where the run stands, next to the history | Metro line (08), Powerline status line (01), Minimap rail (11), Top bar with drawer (12), Neon ticker (18), Frosted glass HUD (04), Spotlight and pill (05), Toasts (10), Orbit (15), No status display |
| Approval | Where approval requests are answered | In the history, Suggestion at the cursor line (14) |
| Arrangement | Where the parts are placed | Fixed, Picture in picture (19), Adaptive dock (20) |
A combination stored by a newer korTTY that names a design this version does not know uses the standard combination's design for that role instead.
Combinations
| Combination | History | Status |
|---|---|---|
| Standard (blocks + metro line) | Blocks in the terminal | Metro line |
| Classic | Classic panel | No status display |
Standard is the default for every connection that does not pick its own combination; the default is marked with ★ in the list. The two built-in combinations cannot be changed: ticking another design while one of them is shown creates your own copy with that change. New starts a copy of the standard combination, Duplicate copies the shown one, Rename and Delete work on your own combinations, and Use as Default makes the shown combination the default. Deleting the default makes Standard the default again. Every change is saved at once.
Preview
The preview is a real terminal pane with a short shell session in which a sample run plays: the agent inspects the session, analyses, runs two commands, asks to shrink the journal, gets the answer 1 and finishes with its answer. It uses your default terminal colours and font, a little smaller. Selecting a row in the table shows that design in the current combination without saving it; Replay starts the run again.
Blocks in the terminal (03)
The run appears as a block directly above the shell's prompt line. Its header names the agent and your question, and shows the elapsed time and the reported tokens; below it there is one row per step with its result, and the running step turns a small spinner. korTTY writes the block into the terminal itself and sends nothing to the server, and the prompt line where you type is never rewritten, so you can keep typing the next command while the agent works.
- Ctrl+R shows or hides the details of the steps, Esc or Ctrl+C cancels the run.
- An approval lists the planned commands with the keys 1 (allow once), 2 (allow always) and 3 (cancel); while it is open these digits answer it and do not reach the shell.
- When the run ends, the block collapses to a header with ✓ (or cancelled, failed), the number of steps, the time and the tokens, followed by the answer. The block then stays in the scrollback like any other output and goes into the session journal's capture.
- The answer is part of the block, so the run dialog's Show final answer in the terminal too option only applies to combinations without blocks.
- While a full-screen program such as
lessorvimis open the block waits and catches up afterwards. A block that scrolled out of the screen during the run continues in a new block above the prompt.
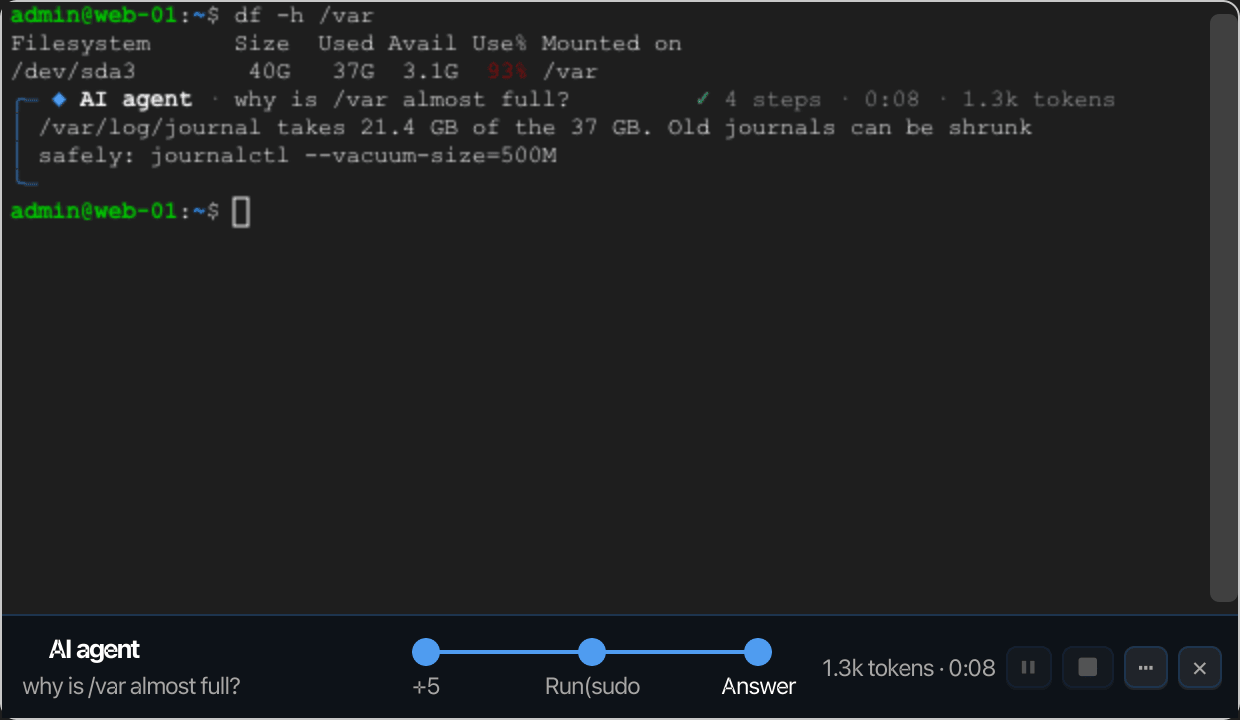
Metro line (08)
A slim bar below the terminal draws the run as a metro line: one station per command, analysis and question, and an Answer station at the end. Reached stations are filled, the current one pulses, a station waiting for your input glows amber, and a light travels along the line as the run moves on; when there are more stations than fit, the oldest are summed up as +N. The bar also shows the question, the tokens and the time, and has buttons to pause, cancel and hide it.
The bar fades out a few seconds after the last run ended; the delay is set in the dialog. View → AI Agent Panel → Show or Hide Status Bar brings it back or hides it.
More status displays
Like the Metro line (08), every display here follows the terminal's run that waits for input, or else its newest run still in progress, and fades out after the last run ended. View → AI Agent Panel → Show or Hide Status Bar brings any of them back or hides it. A display above or beside the terminal takes its room from the terminal while it is shown.
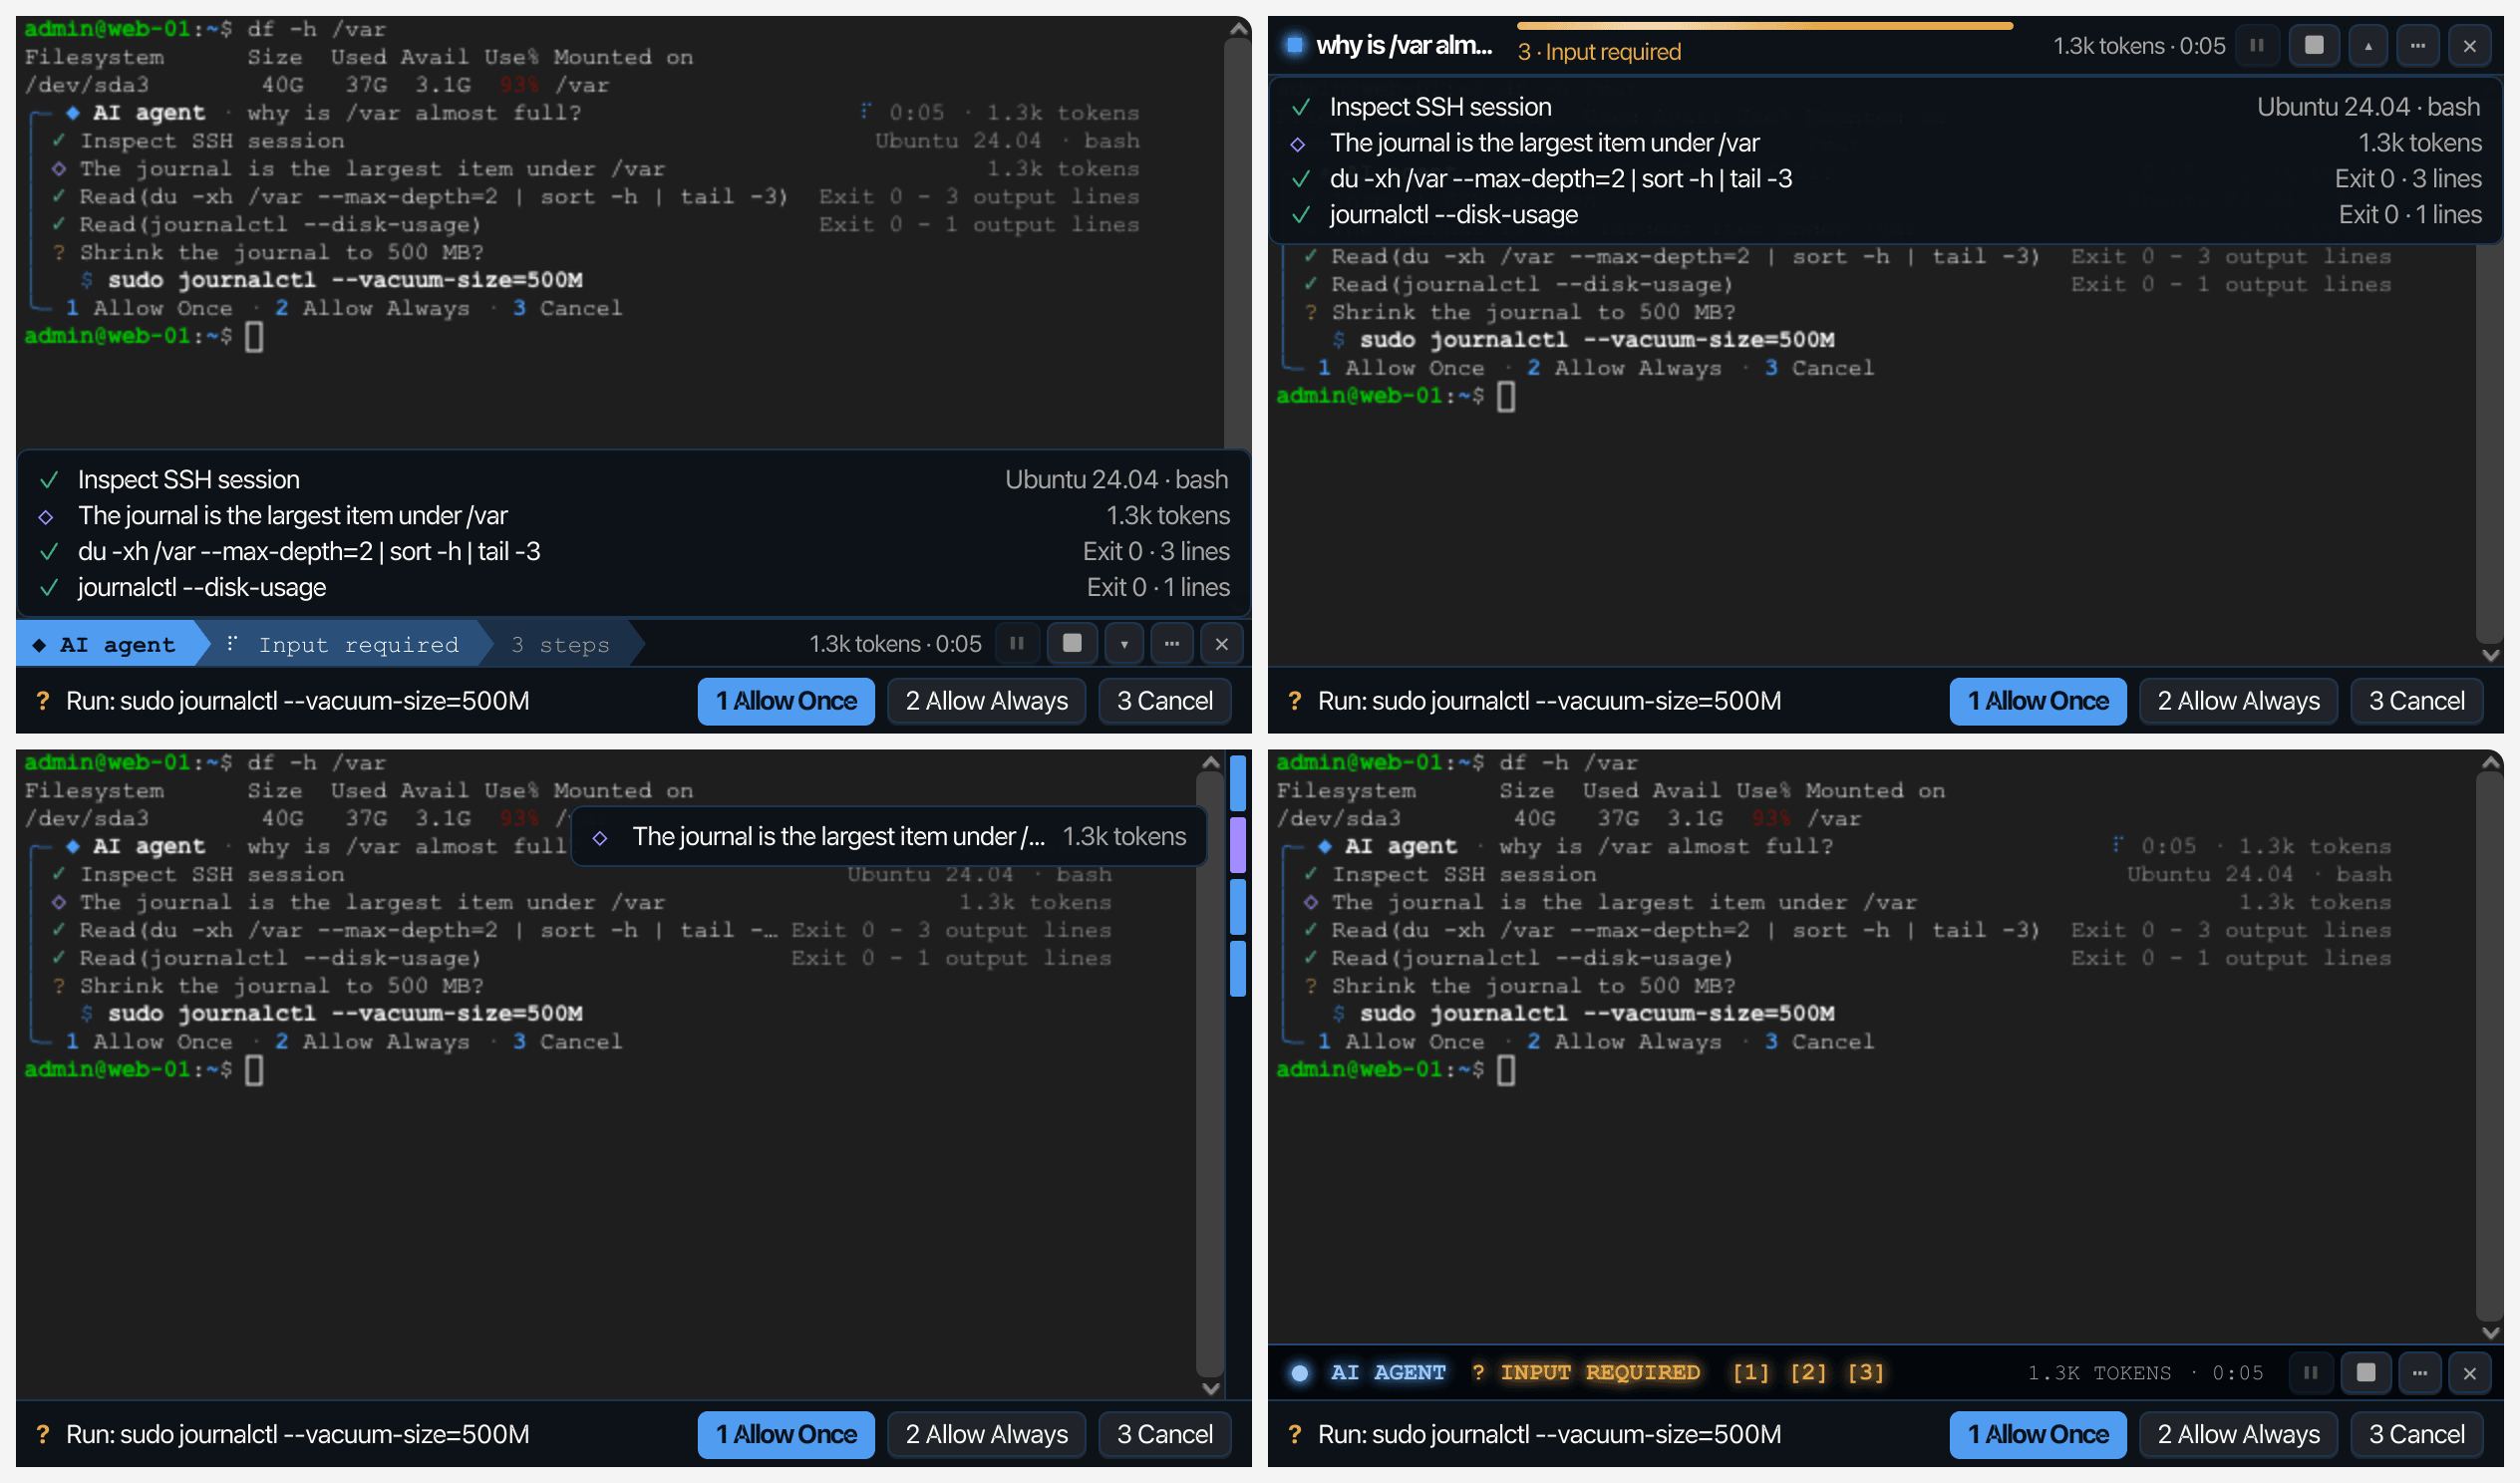
- Powerline status line (01) — One line below the terminal in powerline style: the agent, the step it works on with a spinner, how many commands it ran, the tokens and the time. ▴ unfolds the run's steps over the lowest terminal lines and ▾ folds them again; an open approval unfolds them by itself.
- Top bar with drawer (12) — A bar above the terminal, out of the way of the prompt and the newest output. A shimmering line shows that the agent works and turns green or red when the run ends; below it, the number of commands and the current step. ▾ drops the steps down over the older output.
- Minimap rail (11) — A narrow rail at the right edge of the terminal with one coloured segment per step: blue for commands, violet for analysis, amber for questions, red for errors. The running step glows. Pointing at a segment shows a lens with the step, its result and the first lines of its detail. The rail has no buttons; Esc cancels the run.
- Neon ticker (18) — A bar in the style of a split-flap display below the terminal in the neon look of korTTY's logo: every new step rolls into its window, an open question glows amber with its keys, and the light at the left pulses while the agent works. On a light theme the bar uses the colours of that theme.
History panels
Instead of lines in the terminal, these designs list the run in a panel below or beside the terminal. A panel stays after the run ended, so its result can still be read; ✕ hides it until the next run, and View → AI Agent Panel → Show or Hide Status Bar brings it back. Every panel shows an open approval with its buttons, and the keys 1, 2 and 3 answer it in the terminal as well. The answer is also written into the terminal as before.
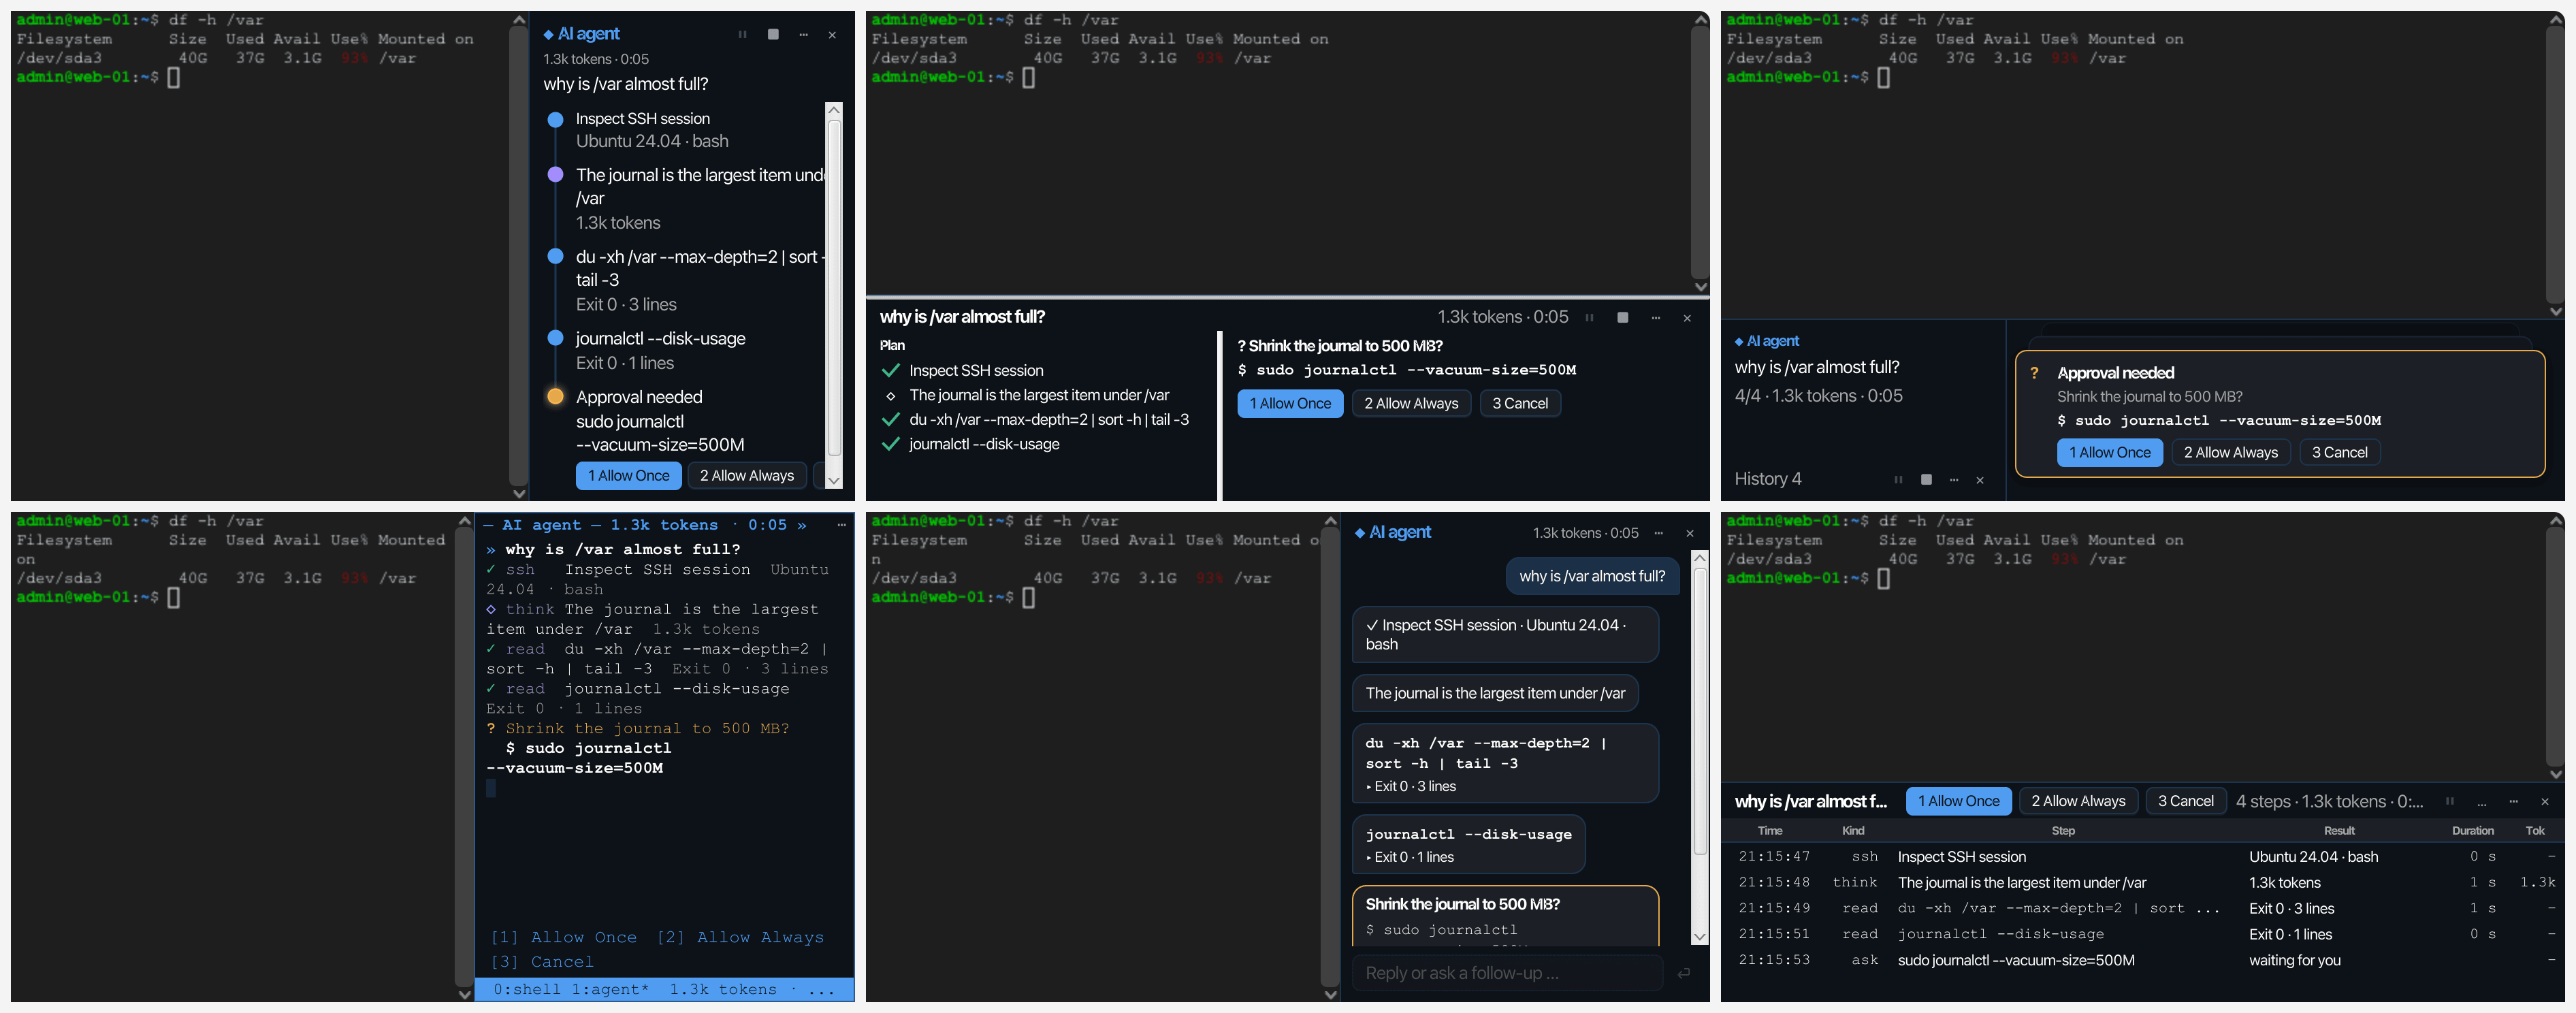
- Side timeline (02) — A column right of the terminal with a vertical line and one node per step: commands in blue, analysis in violet, an open approval in amber with its buttons right at the node, the answer at the end. The line draws itself to each new node and the running node pulses. The terminal keeps its full height.
- Plan and execution (06) — Two columns below the terminal. On the left the run's steps as a checklist whose ticks draw themselves; on the right only what runs now: the command with its exit code and its last output lines, an open approval, or after the run the answer. A thin bar on top fills with the progress.
- Card stack (07) — Below the terminal, a narrow column with the question, the progress and the buttons, and beside it a stack of cards: the current step in front in full, the two before it peeking out behind. The mouse wheel leafs through the older steps; an approval is the front card with its buttons.
- tmux pane (09) — A pane right of the terminal in the terminal's font and colours, framed by lines: one line per step with its kind (
ssh,read,run,think), the answer typed out behind a block cursor, and a blue status line at the bottom. It takes about 40 % of the width. - Conversation (13) — A chat in a column right of the terminal: your question on the right, the agent on the left with its thoughts as text and its commands as code blocks with their exit code, which unfold to their output with a click. Three dots bounce while it works. The field below asks a follow-up question, which starts a new run in the same terminal once the current one ended.
- Log table (16) — A dense table below the terminal with the time, kind, step, result, duration and tokens of every step. A new row flashes blue, the running row has a small spinner, and an open approval puts its buttons into the header. A double-click on a row shows its output, on the last row the answer.
In the terminal: focus mode and the cursor line
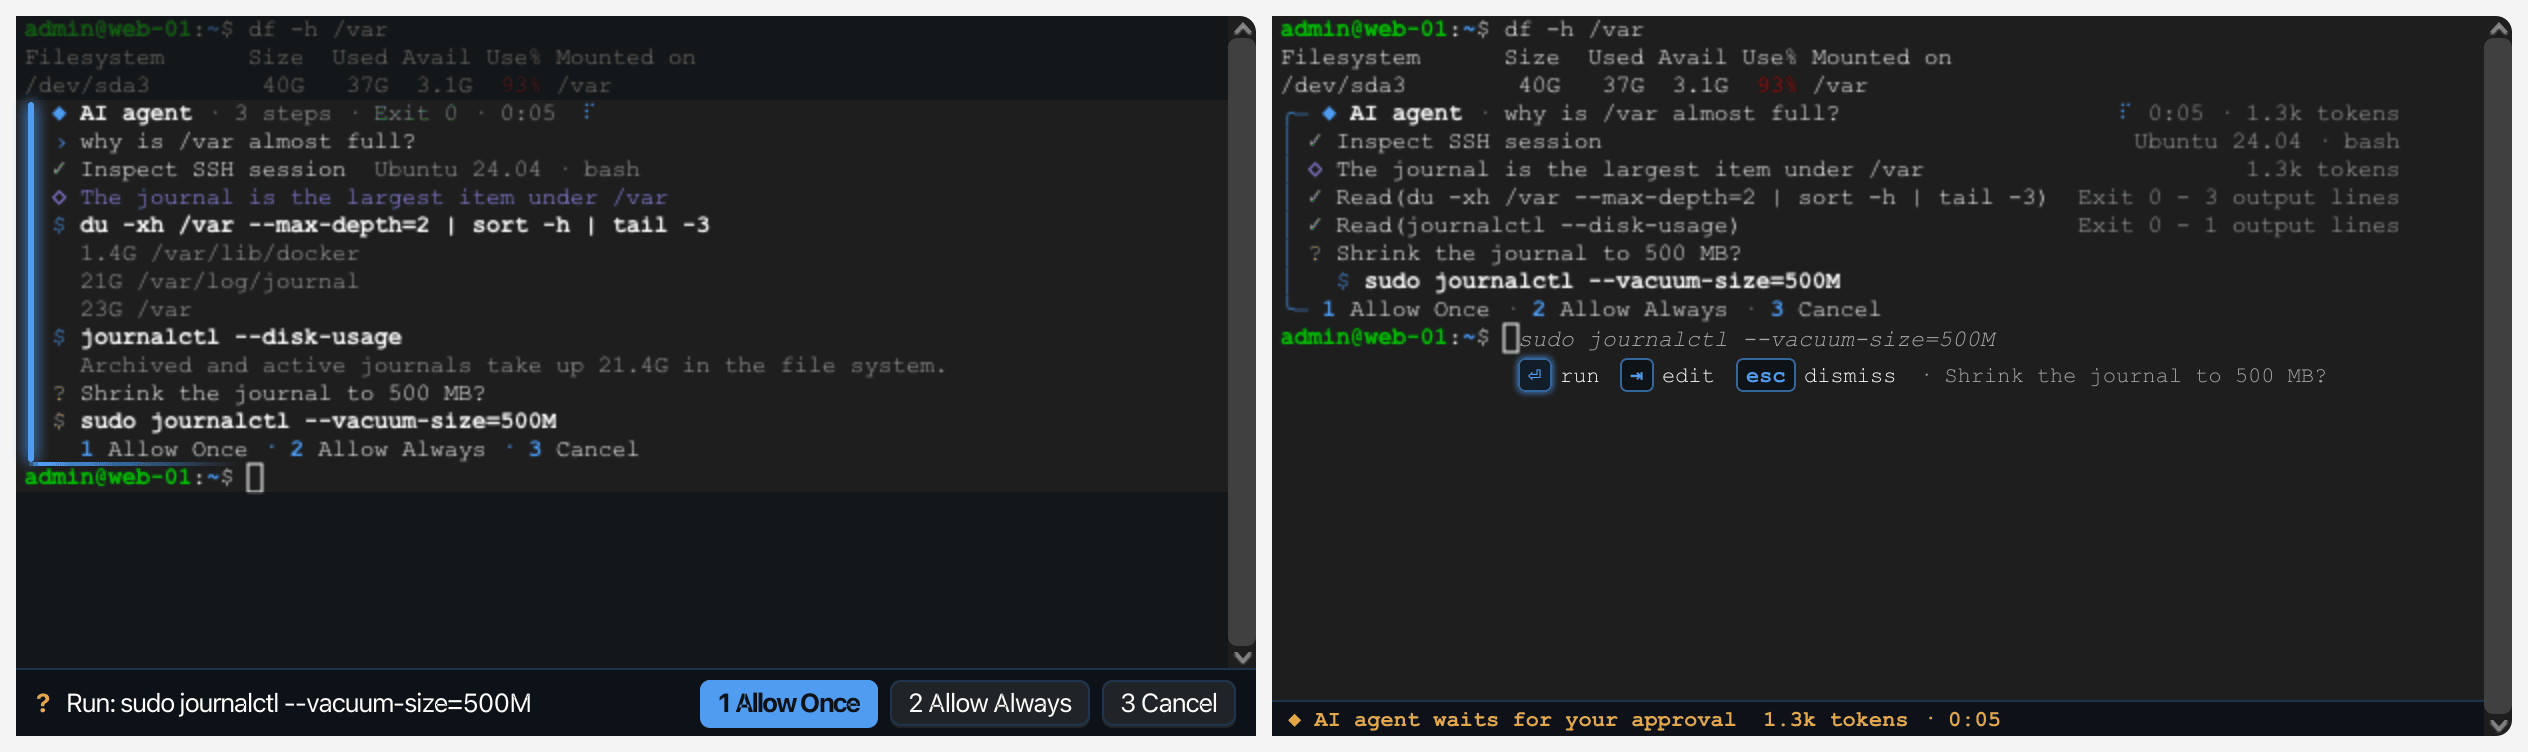
- Focus mode (17) — A history design that writes what the agent does into the terminal as if it had typed it: each command as
$ commandwith its last output lines, its conclusions, an open approval with its keys, and after the run the answer. A glowing bar marks these lines, a light runs along under them while the agent works, and the rest of the terminal dims; the line you type in stays bright. When the run ends the terminal brightens again and the lines stay in the scrollback. - Suggestion at the cursor line (14) — An approval design: the command the agent wants to run appears as ghost text right where you type, with a hint below it, and a line at the bottom of the terminal says that the agent waits. Enter runs it once; Tab takes it over: the run ends and the command is typed at the prompt for you to edit; Esc declines. The keys 1, 2 and 3 still answer as everywhere. A password request still uses the row below the terminal.
Floating displays
These status designs float over the terminal, which keeps its full size. They stay clear of the rows below the terminal and fade out after the last run ended, like the bars.
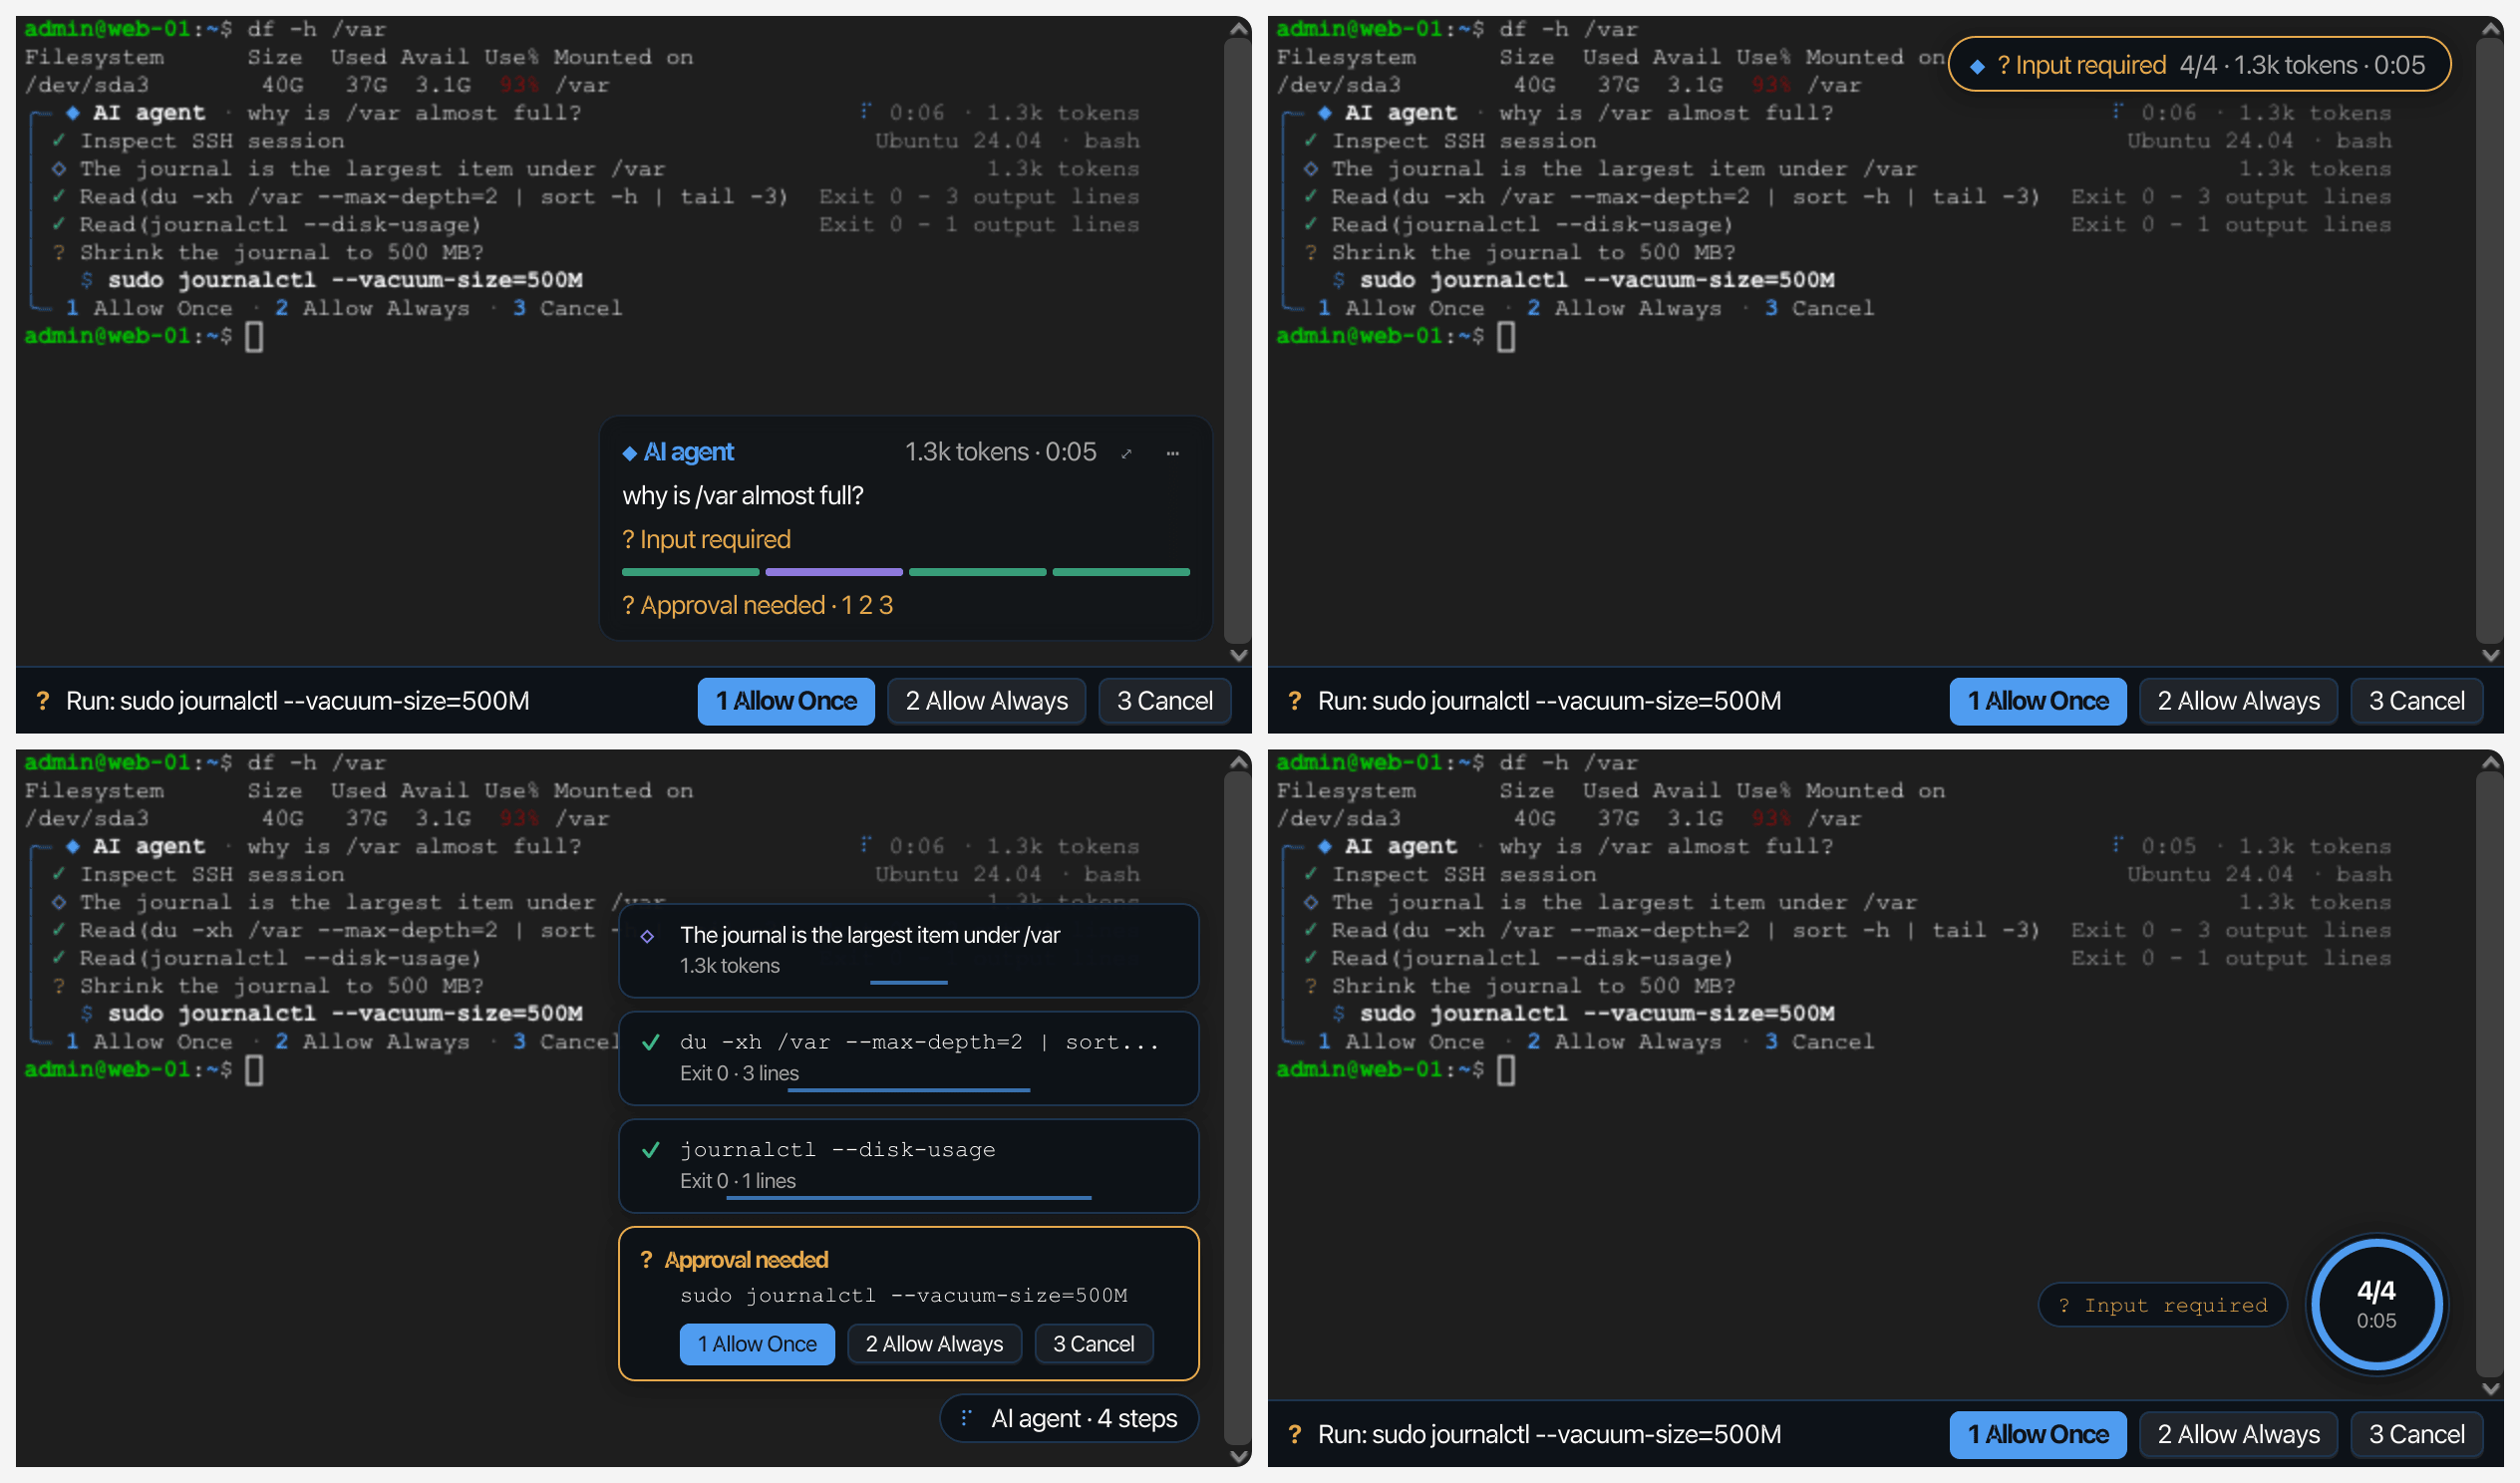
- Frosted glass HUD (04) — A translucent card over the bottom-right corner with the question, the step being run, the progress in segments and the tokens. While you type in the terminal it fades to 35 %, so the text under it stays readable. ⤢ unfolds the run's steps above it.
- Spotlight and pill (05) — A small pill in the top-right corner with the current step, how far the run got and the time; a click unfolds the steps below it. View → AI Agent Panel → Ask in Spotlight… opens a field in the middle of the terminal where you ask the agent, with the profile to use and your earlier questions on Up and Down. Enter starts the run as
agent …at the shell would, and the field shrinks into the pill. - Toasts (10) — Every finished step slides in as a short notice at the bottom right and goes again after a few seconds, a bar in each showing when. An approval stays until it is answered, with its buttons. A badge counts the steps; a click on it shows them all.
- Orbit (15) — A 72-pixel circle in the bottom-right corner: its ring fills with the run's progress, dots circle it while the agent works, and the middle shows the step count and the time; a label beside it names the current command. A click lets the steps bloom out of the circle.
Arrangements
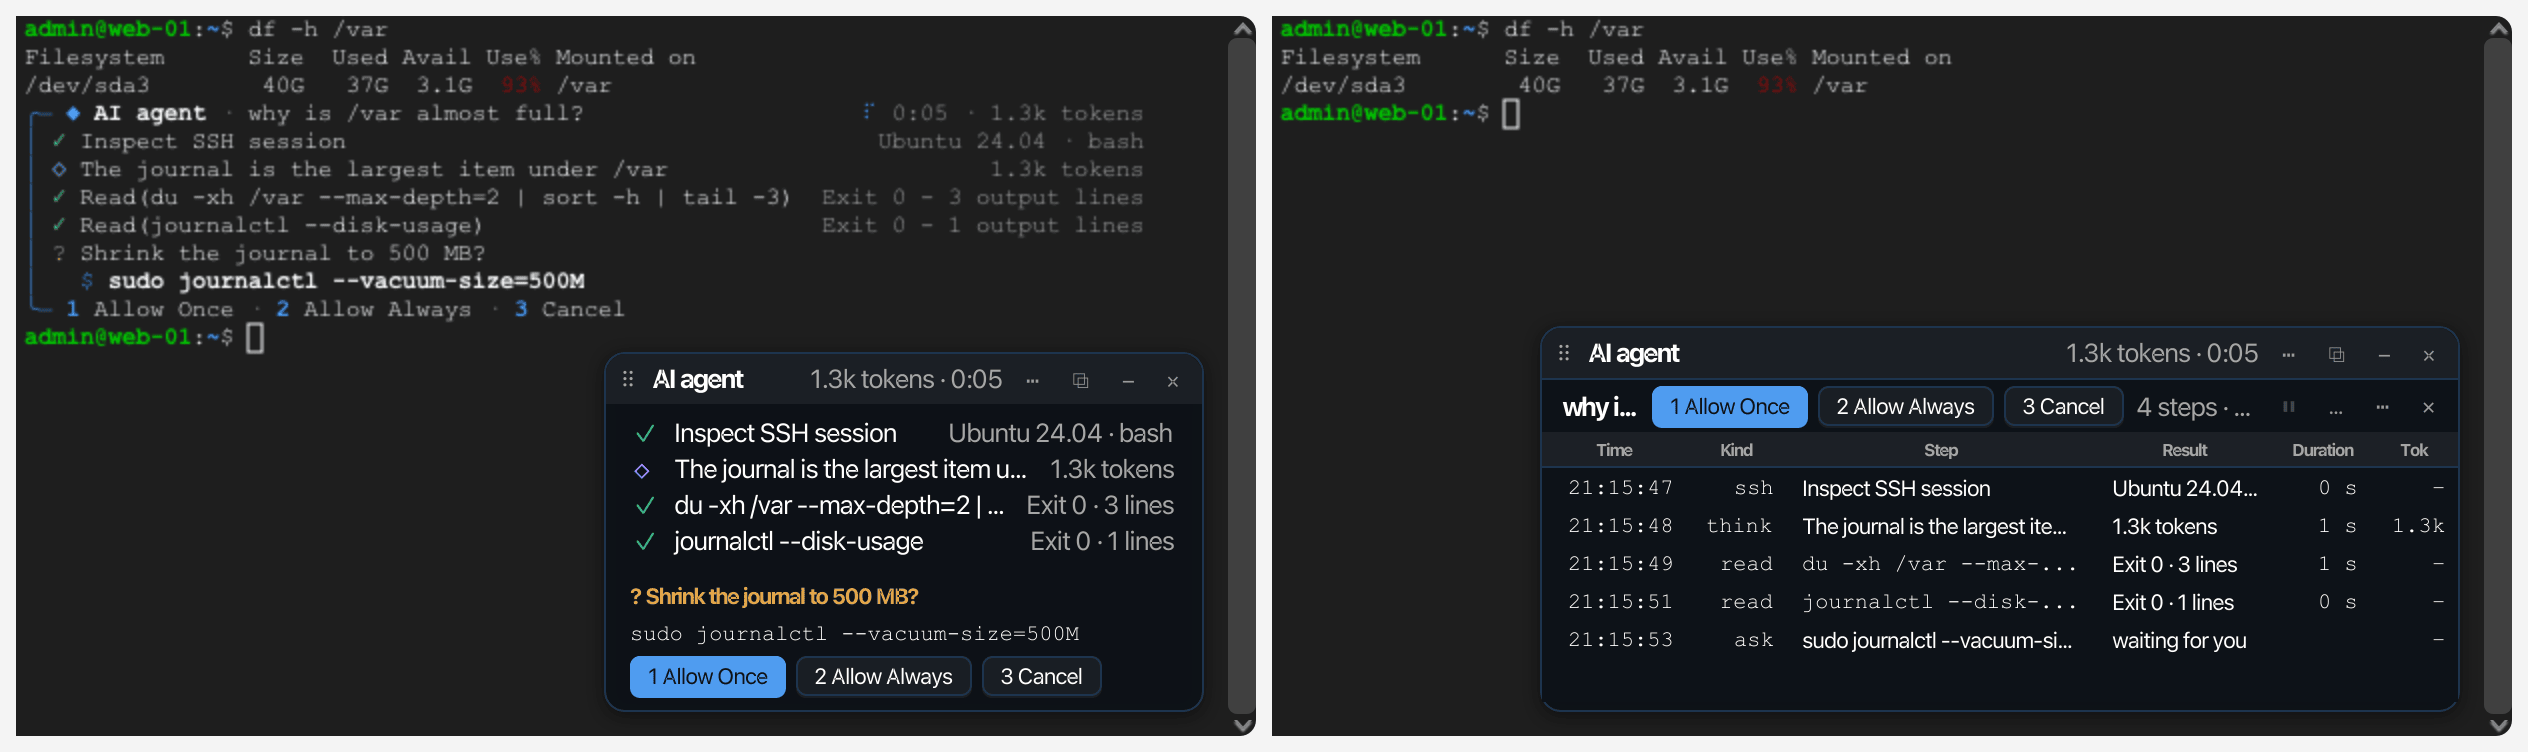
- Picture in picture (19) — A small window floating over the terminal. Drag it by its title and it shows the four corners it can go to, then springs into the nearest one when you let go. ⧉ makes it a window of its own, for example for a second screen, and docks it back; – folds it to its title, × hides it until the next run. With a history panel in the combination the window holds that panel; otherwise it lists the run's steps and an open approval with its buttons. Several runs in the same terminal become tabs.
- Adaptive dock (20) — Picks the status display by the terminal's size: a wide and tall terminal (from 150 columns and 30 rows) gets the side timeline, a small one (under 70 columns or 16 rows) the status pill, anything between the Powerline status line. A display it chose stays until the size is clearly past the other side, so dragging a split does not make it flicker. After the last run a countdown ring shows how long the result stays.
Approvals and passwords
An approval is answered with the keys 1 (allow once), 2 (allow always) and 3 (cancel) in the terminal, or with buttons. Designs with buttons of their own show them: the history panels, the toasts and the picture-in-picture window. With blocks in the terminal, focus mode or the classic panel's history, an approval opens a row below the terminal with the commands and the buttons 1 Allow Once, 2 Allow Always and 3 Cancel. A password request always opens that row, with a masked field, Use for this SSH session and OK; Enter submits and Esc cancels. The classic panel keeps its own prompts.
Solution options and memory in designs
With a design other than the classic panel, the solution options of the agent (see Solution options) appear in the design's strip with the same choices. The Sent along line of a run is a link in the design's host, and a rule suggestion opens as a popup over the design; see AI memory.
Continue a run in an AI chat
When a terminal run has finished, a bar appears under the terminal. It shows the run's status (✓ Run finished or ✕ Run stopped or failed) and its task, then the button Continue in AI chat, the field Follow-up question about the run… and ✕ to hide the bar. The bar appears in every design, the classic panel included. It stays until the next run starts, until you hide it or until the chat opens.
Continue in AI chat opens the run in an AI chat, see Chats from AI agent runs: the task is the first message, the final answer the reply, and the steps of the run are listed under the reply in a collapsed Steps list. A second click on the button focuses the same chat instead of making another one.
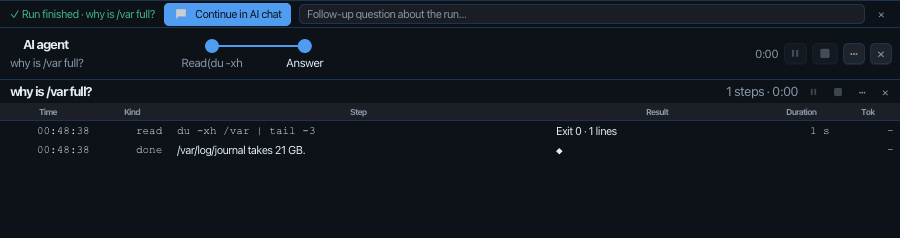
Type a follow-up question into the field and press Enter: the chat opens and the question is sent there. Pressing Enter in an empty field only opens the chat. A question the chat cannot take at the moment, because it is still answering, goes into the chat's input field instead.
The same action is the run menu's entry Continue in AI chat, see below. It is greyed out while AI features are off or your organisation's policy does not allow AI chats; the bar then keeps its controls visible, greyed out too.
Note
Only runs started from the terminal are handed over. A question asked with Ask Agent…, which runs no commands, and a run in the chat window do not get the bar or the menu entry.
Run menu and step menu
Every design offers what the classic panel's buttons do. The bars, the history panels, the frosted glass HUD and the picture-in-picture window have a ⋯ button; the status pill, the orbit, the minimap rail and the badge of the toasts open the same menu with a right-click. It works on the run the design shows:
| Entry | Effect |
|---|---|
| Workflow… | Turns the finished run into a reusable script, see Generate Workflow Script |
| Export this run | Saves the finished run as Markdown, text, YAML, XML, JSON, PDF or Asciidoctor |
| Export all runs | Saves every finished run the terminal keeps in one file |
| Run again | Starts the same agent command again |
| Copy answer | Copies the run's answer |
| Continue in AI chat | Opens the run in an AI chat, as described in Continue a run in an AI chat |
| Runs of this terminal | Shows another run of the terminal: the ones still working and the last five that finished |
Every design except the classic panel also offers the newest run of the terminal in the terminal's context menu, under AI → Last agent run, with the same entries. The classic panel has its own buttons, so the bar is its way to continue a run in a chat.
A right-click on a step opens its own menu with Copy command, Copy output, Copy entry and Open in Snippet Editor. That works on a node of the side timeline, a row of the plan or the log table, a card of the stack, a block of the conversation, a line of the tmux pane, a segment of the minimap rail, a toast and a step in the picture-in-picture window.
Options
| Option | Effect |
|---|---|
| Hide the status bar after a run after (seconds, 0 = keep) | How long the status display stays after the last run ended; 0 keeps it until you hide it. Default: 6 seconds. |
| Reduce animations | Turns off the moving parts of every design: the pulsing station and the moving light of the Metro line, the spinners, the shimmer of the Top bar with drawer, the rolling and glowing of the Neon ticker, the lens animation of the Minimap rail, the sliding, popping and blooming of the history panels and floating displays, the typing of the tmux pane and the ghost text, the glass of the Frosted glass HUD and the fading of Focus mode. |
A design per connection
The AI tab of the connection editor has an AI agent design list: Use the default (with the current default's name) or any combination. The choice applies from the next run on that connection. Because your own combinations live in this computer's settings, the choice is not part of an exported connection; a connection whose combination was deleted shows Stored combination (currently unavailable) and uses the default.
Colours
The designs take their colours from the Terminal AI agent panel colours of the connection's terminal theme, which the theme editor on the Themes tab shows. A theme whose cursor is white or grey gets a blue accent, a lighter one on dark themes and a darker one on light themes; the panel background follows the terminal's own background with only a faint tint. Agent panel colours that korTTY derived for a theme before the blue accent are derived again once; colours you picked yourself stay. Green is kept for finished steps.
Docked to the side
View → AI Agent Panel → Dock Left or Dock Right shows the classic panel in the side dock; blocks keep appearing in the terminal, and the metro line moves into the dock with the panel.
Stored settings
| File | Element | Meaning |
|---|---|---|
global-settings.xml |
aiAgentDesignDefaultId |
The default combination; absent for Standard |
global-settings.xml |
aiAgentDesignCombinations |
Your own combinations, one combination element each |
global-settings.xml |
aiAgentDesignAutoHideSeconds |
The status bar delay; absent for 6 seconds |
global-settings.xml |
aiAgentDesignReducedAnimations |
Reduce animations |
connections.xml |
aiAgentDesignId |
A connection's own combination; absent for the default |